Lunapic Hue Image
Indeed, Lunapic is a versatile and user-friendly online photo editing platform. It’s for beginners and experienced users. They want to quickly edit images without complex software. Here’s a bit more detail on its features:
- Lunapic provides many editing tools. These include crop, resize, draw, and more. They allow for precise control over editing.
- Filters and effects can apply artistic touches to your photos. They include vintage looks, black and white, sepia, and others.
- You can make animated images with special effects. They add a dynamic element to your pictures.
- Compatibility is the ability to upload images from various sources. These sources include your local computer, a URL, or cloud services. This ability makes it highly convenient.
- No Installation Required. Lunapic operates in a web browser. There’s no need to download or install any software.
- Sharing and Saving: After editing, you can save your work to your computer. You can share it on social media or print it directly from the website.
People particularly like Lunapic’s platform for its simple interface. It also offers freedom to quickly edit and improve images. This makes it a popular choice for casual photo editing.

Lunapic hue image refers to the process of changing the colors of an image or photo by using the hue adjustment tool available on the free online photo editor Lunapic Hue is a property of color that describes how it relates to other colors on the color wheel. By adjusting the hue, you can create different color effects and variations on your image.
How can I change the hue of my image using Lunapic?
A: To change the hue of your image using Lunapic, follow these steps:
Upload your image to Lunapic using the menu above or the Lunapic website.


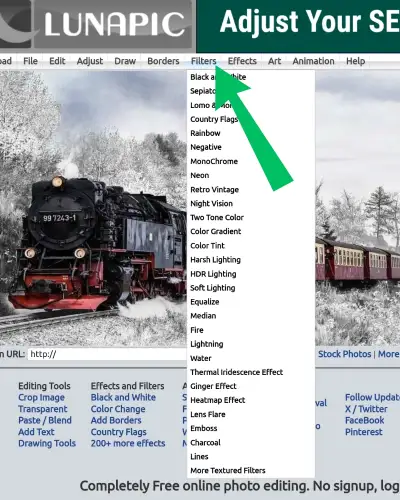
Go to Filters > Color Tint or use the direct link.

Drag the slider in the tool options tab to adjust the hue in the image. You can also enter a specific hue value in degrees.

Click Apply to see the result. You can also compare the original and edited image by clicking the Compare button.
Save your image by clicking the Save button. Or, use the menu above to export it in different formats or share it on social media.
How do I change the color of an image in Lunapic?
The Replace Color tool allows you to change a color fully to another in your image. For example, if you want to change the blue sky to green, you can select a green color and click on the blue area in your image. The tool will replace all the pixels that are close to the blue color with the green color. You can use the tolerance slider to control how similar the colors have to be to be replaced. More colors will replace with a higher tolerance. Only the exact color will be replaced with a lower tolerance. You can also use the fade slider to control how much the new color blends with the original color. A higher fade means the new color will be more transparent. A lower fade means the new color will be more opaque.
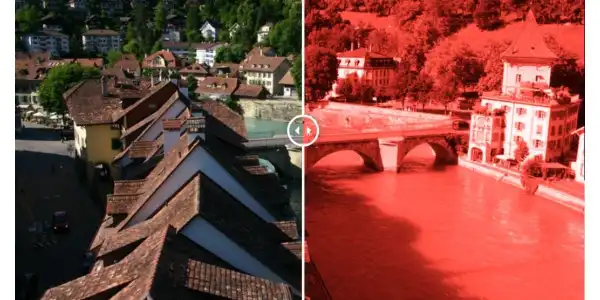
The Color Tint tool allows you to add a color tint to your image. For example, if you want to make your image look warmer, you can select a red or orange color and click on the tint button. The tool will apply the color tint to the whole image, making it look more reddish or orange. You can use the fade slider to control how strong the color tint is. A higher fade means the color tint will be more subtle. A lower fade means the color tint will be more noticeable.
You can find both tools under the Adjust menu in Lunapic. You can also use the undo button to revert any changes you make. I hope this helps you understand how to change the color of an image in Lunapic.
What is the difference between Replace Color and Color Tint?
Replace Color changes a specific color in your image to another color. Color Tint applies a color tint to the whole image. Replace Color allows you to select the color you want to change and the color you want to replace it with. Color Tint allows you to select the color you want to add as a tint. You can use Replace Color to change the color of an object or background, and you can use Color Tint to create.
a mood or a style for your image.
What are some tips and tricks for using the hue change tool on Lunapic?
A: Some tips and tricks for using the hue adjustment tool on Lunapic are:
Experiment with different hue values to create different color effects and moods. For example, you can create a warm or cool tone, a retro or futuristic look, or a monochrome or rainbow effect.
Use the hue adjustment tool in combination with other tools and filters on Lunapic. This will help you create more complex and creative edits. For example, you can use the color gradient, color tint, or color spotting tools. They create selective color effects. Or, use the blur, sharpen, or pixelate tools to create contrast or focus effects.
Use the undo and redo buttons or the history list to go back and forth between different edits and compare them. You can also use the compare button to see the original and edited image side by side.
How can I use hue adjustment to improve my photos?
Hue adjustment is a technique that allows you to change the colors of your photos. You do this by shifting them along the color wheel. By adjusting the hue, you can create different color effects. You can also correct color casts or enhance your photos’ mood.
To use hue adjustment in Photoshop, you can follow these steps.
Select the layer you want to adjust.
Go to Image > Adjustments > Hue/Saturation or press Ctrl+U / Cmd+U for the Hue/Saturation dialog box.
Move the Hue slider to change the color. Use the Saturation slider to adjust intensity. Use the Lightness slider to tweak the brightness.
You can also use the Hue/Saturation adjustment layer. This lets you apply hue adjustment non-destructively and selectively. For more tips and tricks on how to use hue adjustment effectively, you can check out these resources:
Color basics: Learn to work with color in After Effects.
Sync smart light with music. Watch as your lights flash, dance, dim, brighten, and change color in tune with the beat and mood of your music.
The skin-care industry has a long way to go in making products that work for skin of color. Learn how hue adjustment can help you achieve a more natural and flattering look for your skin tone.
Learn how to make your images pop using Hue/Saturation layer adjustments in Photoshop.
Photo Processing Basics: Use Hue & Saturation Effectively. Learn how to use the Hue/Saturation tool in Photoshop to fine-tune white balance, remove color casts, and boost color intensity.
What is the difference between hue and saturation?
Hue and saturation are two properties of color. They describe how it relates to other colors on the color wheel. Hue is the purest form of a color, such as red, blue, or green. Saturation is the degree of brightness or dullness of a hue. A color with high saturation is vivid and intense, while a color with low saturation is grayish and muted. You can adjust the hue and saturation of an image using tools like Photoshop or Lunapic. This allows you to create different color effects and moods.
What is the difference between hue and brightness?
Hue and brightness are two properties of color. They describe how it relates to other colors on the color wheel. Hue is the purest form of a color, such as red, blue, or green. Brightness is the relative degree of black or white mixed with a given hue. A color with high brightness is light and a color with low brightness is dark. You can adjust an image’s hue and brightness using tools like Photoshop or Lunapic. This can create different color effects and moods.
How can I use hue and brightness to create a pastel look?
To create a pastel look, lower the saturation and increase the lightness of your colors. You can do this by using photo editing tools like Photoshop or Lunapic. Here are some steps you can follow:
Upload your photo to your preferred photo editor. Adjust the hue and saturation levels. You can use the Hue/Saturation tool in Photoshop or the Color Tint tool in Lunapic. Move the hue slider to change the color and the saturation slider to reduce the intensity.
Use the Brightness/Contrast tool in Photoshop to increase the brightness of your photo. Alternatively, use the Adjust tool in Lunapic. Move the brightness slider to the right to make your photo lighter and softer.
Optionally, you can also add some pastel filters or effects to enhance your photo. You can use the Soft Pink or Macaron effect packs in YouCam Perfect to create a dreamy pastel look. Or, use the Fantasy sky backgrounds in Lunapic.
Frequently Asked Questions ?
How do I change the color of an image in Lunapic?
To change the color of an image in Lunapic, you can use the Replace Color or Color Tint tools under the Adjust menu. You can select a new color and click on the color you want to change in your image. You can also adjust the tolerance and fade levels to fine-tune the effect.
How do you add color tint to a photo?
You can use various online tools such as Canva, PiXimperfect, Luminar, Pixelied, or Fotor to add color tint to a photo. These tools let you apply different filters, effects, and adjustments to your photo to create a tinted look. You can also use the Hue/Saturation or Gradient Map tools in Photoshop to achieve a similar result.
How do you make a picture red?
To make a picture red, you can use the Color Tint tool in Lunapic and select a red hue. You can also use the Hue/Saturation tool in Photoshop and move the Hue slider to the red range. Alternatively, in Photoshop, you can use the Replace Color tool. Select the colors you want to replace with red.
How can I color a picture online?
You can use the AI Photo Colorizer tools from ImgGo or Fotor to color a picture online. These tools can automatically add realistic colors to your black and white photos. They use artificial intelligence and deep learning. You can also adjust the color temperature, tint, brightness, and other settings. This can improve the result.
Can we change image color?
To change the color of an image, you can use different color modes depending on your purpose and medium. Color modes are the settings that determine how colors combine. The number of channels in a color model forms the basis for this. Some common color modes are LAB, RGB, CMYK, index, grayscale, and bitmap. They differ in quality and file size. You can use different color modes to optimize your images for screen or print. You can also achieve different effects and styles.
What is image color mode?
The term “image color mode” explains how an image file represents and stores colors. Different image color modes use different methods to combine primary colors. For example, they may use red, green, and blue. They do this to create a range of colors. The image color mode affects the file size and quality. It also influences how different devices and media can edit and display the image.
