Introduction
Definition of Selection Tools
Selection tools allow you to choose an object or specific region within an image. You can then separate it from the rest of the image.
Selection tools are helpful for image editing. They let you apply different effects, adjustments, filters, or transformations to only the selected area or object. This leaves other areas of the image unaltered.
Selection tools also aids in to cut, copy, paste, move, or delete an object or area from the image.
Importance in Image Editing
Selection tools are essential in image editing. They allow you to create more realistic and imaginative compositions. You can combine elements from different images.
Selection tools are crucial when editing images. They let you improve or fix particular parts of an image. You can delete unwanted objects and change the background. You can also adjust the brightness or color, and add text or graphics.
Selection tools are crucial in image editing. They give you more control and flexibility over your edits. You can change the shape, size, position, or feathering of your selected area to suit your needs.
Types of selection tools
- Marquee Selection.
This tool lets you select an area by dragging an elliptical or rectangular shape over it. You can use it to apply effects, crop, copy, and move to a specified area.
To use this tool, select the Rectangular Marquee or the Elliptical Marquee tool in the Tools panel.
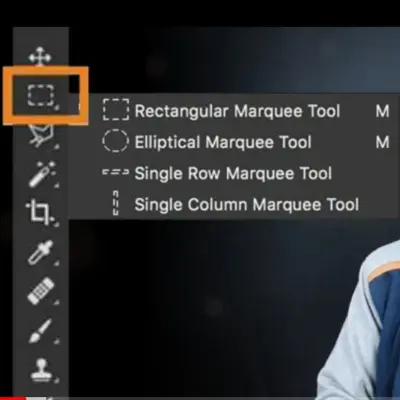
Click and drag to make a rectangular or elliptical selection. If you want a square or a circle, press the Shift key as you are dragging.
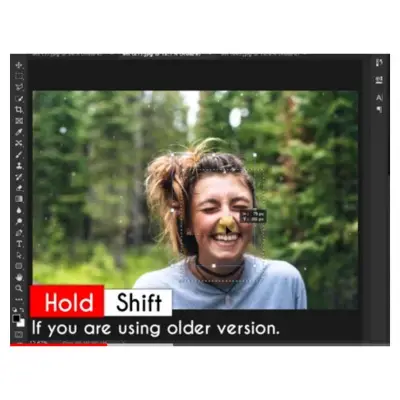
To start the selection from the center, press the Alt or Option key as you are dragging.
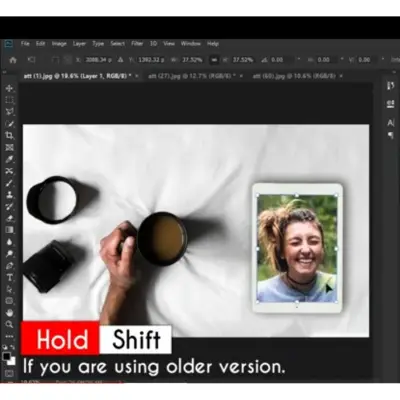
You can also change the style and size of the selection in the options bar.
- Lasso Selection.
With this tool, you can easily create a freehand outline around a part of an image. It is useful for picking out asymmetrical shapes or objects. The marquee tool is not good for isolating them.
To use this tool, select the Lasso tool in the Tools panel.
Click and drag to make a free-form selection. When you are back near the beginning, release your finger from the mouse/trackpad. This will close the selection.
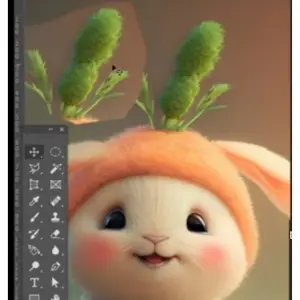
You can also use the Polygonal Lasso tool to make straight edged segments of a selection.
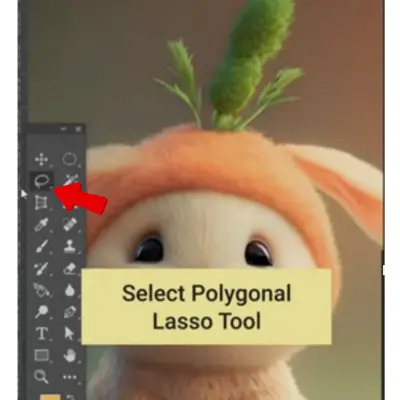
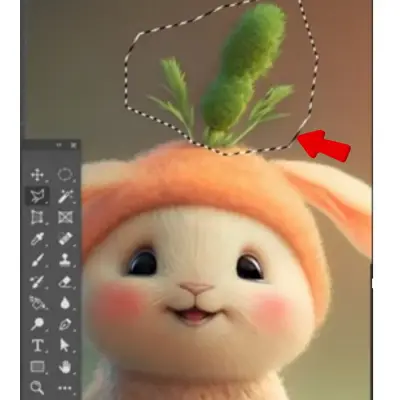
To do this, click at the beginning of a straight edge, and then release your finger from the mouse. Without pressing down on the mouse/trackpad, move to the end of that straight edge. Click to attach the selection. Repeat around the area you want to select. When you are back at the beginning and a small circle appears, click to close the selection.
- Magic Wand.
This tool uses color and tone to select pixels. You can use it to select areas of an image with similar color schemes. You can change the tolerance level to control the degree to which the pixels match the chosen colour.
To use this tool, select the Magic Wand tool in the Tools panel.
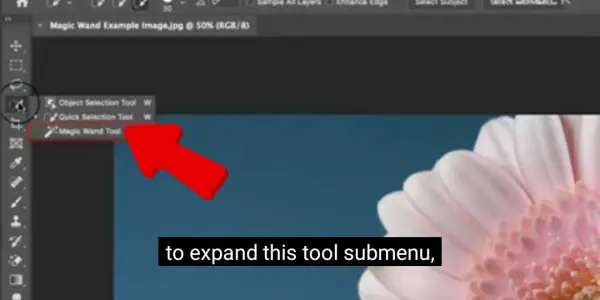
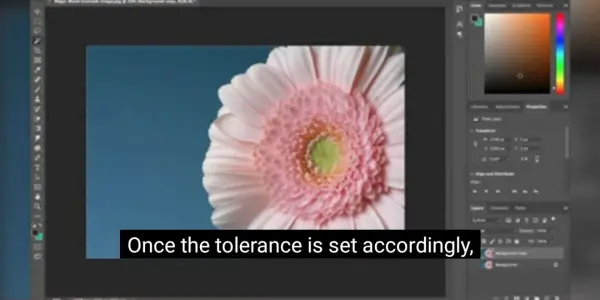
Click on a pixel in the image that represents the color you want to select. The tool will select all the contiguous pixels that have a similar color.
To add more pixels to the selection, hold the Shift key and click on another pixel. To subtract pixels from the selection, hold the Alt or Option key and click on a pixel.
You can also use the contiguous and anti-aliasing settings in the options bar to soften the edges. This restricts the selection to adjacent pixels.
Advanced selection tools
- Quick Selection.
This tool helps you paint over a specific area of an image with a brush. It automatically identifies the object’s edges and expands the selection. The tool is useful for choosing complex designs. It’s also useful for choosing items that stand out vividly against the image’s background.
To use this tool, select the Quick Selection tool in the Tools panel.
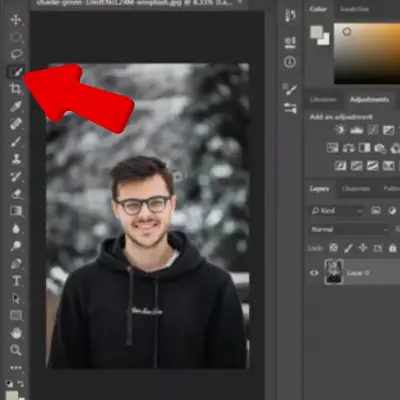
Click and drag over the area you want to select. The tool will create a selection based on the color and tone of the pixels you paint over.
To add more pixels to the selection, hold the Shift key and paint over them. To subtract pixels from the selection, hold the Alt or Option key and paint over them.
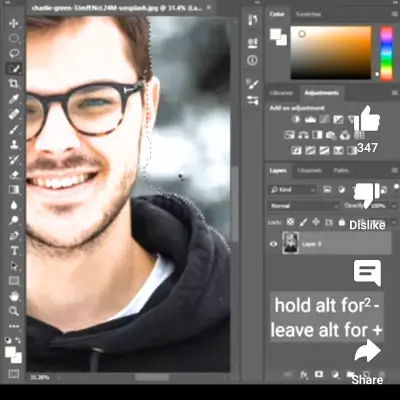
You can also adjust the size, hardness, and spacing of the brush in the options bar.
- Pen Tool.
With this tool, you can precisely draw a path around a part of an image. The Pen tool can be used to draw straight or curved lines with ease. You position anchor points and alter their handles. It’s helpful for selecting objects with smooth curves or sharp edges.
To use this tool, select the Pen tool in the Tools panel.
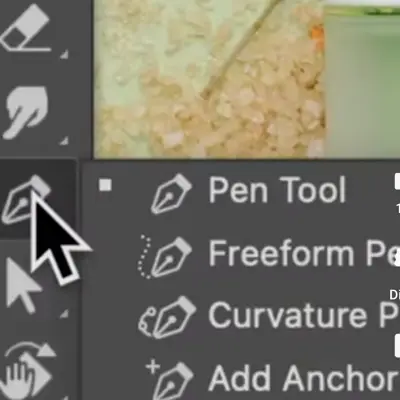
Click where you want your path to begin to place your first anchor point.
Click where you want your path to end to place a second anchor point. A straight path will connect them.
To create a curved path, click and drag to adjust the direction and length of the handle. The handle controls the shape of the curve.
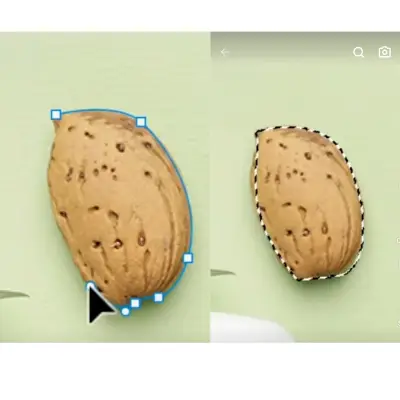
To close the path, click on the first anchor point. A small circle will appear next to the Pen tool when you hover over it.

- Magnetic Lasso.
This tool selects a part of an image by automatically snapping to the edges of the object. It can be applied to select objects that have sharp edges and a strong contrast with the background.
To use this tool, select the Magnetic Lasso tool in the Tools panel.
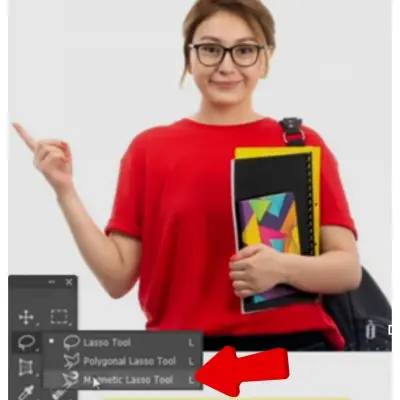
Click on the edge of the object you want to select to place your first anchor point.
Move the cursor along the edge of the object. The tool will create a selection that follows the edge. You can also click to add more anchor points manually.
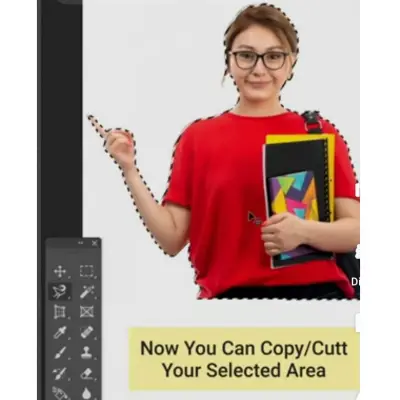
To end the selection, double-clicking or return back to the original anchor point. The Magnetic Lasso tool will cause a small circle next to it when you hover over it. Know about Colour Correction
Functions and Features
- . Editing and Modifying Selections
Feathering
Feathering softens the edges of a selection. This produces a seamless transition between the selected area and the surrounding pixels. By doing so, you can prevent hard or sharp edges. This helps the selection blend more organically into the image.
You can use the Elliptical Marquee, Rectangular Marquee, Lasso, Polygonal Lasso, or Magnetic Lasso tool. Apply feathering to the selection using these tools. Enter a feather value in the options bar. The feather value will fix the width of the blurred edge in pixels.
You can also add feathering to an existing selection. To do this, choose Select > Feather and enter a feather value in the dialog box.
Feathering effects are visible when you move, cut, copy, or fill the selection.
Refining Edges
The tool called refining edges lets you fine-tune and improve a selection. This is especially helpful when dealing with complex or detailed edges. For example, the edges of hair, fur, or foliage.
To use the Refine Edge tool, you need to make a selection first using any of the selection tools. Then, choose Select > Refine Edge or click the Refine Edge button in the options bar.
In the Refine Edge dialogue box, you can adjust the selection’s edge. You can do this using several parameters and options. You can shift, smooth, feather, and adjust contrast. You can also use the Refine Edge brush to paint over the areas that need more refinement.
The Refine Edge tool lets you preview its output in a variety of modes, including on black, white, or layers. You can also choose the output of the refined selection: a layer mask, or a new layer.
Refining edges will help you create more precise and realistic selections and masks for your images.
- Transformations
Move, Scale, and Rotate Selections
You can move, scale, and rotate selections to change the position, size, and angle of an image object.
To use these transformations, you need to select an area or object first using any of the selection tools. Then, choose Edit > Free Transform or press Ctrl+T (Win) / Command+T (Mac) to enter the Free Transform mode.
In Free Transform mode, you can see a bounding box. It has handles at the corners and sides, surrounding the selection. You can change the transformation’s pivot point by moving the visible reference point at the selection’s center.
To move the selection, click and drag within the bounding box. Click and drag a handle to resize the selection. To rotate the selection, click and drag it. Move the cursor outside the bounding box until it becomes a curved arrow.
You can also use the options bar to specify precise transformation parameters. For example, you can specify the width, height, angle, and position.
To apply the transformation, press Enter or Return. To cancel the transformation, press Esc.
Inverse Selection
A function called “inverse selection” reverses the selection. The area that was before selected becomes unselected. The area that was before unselected becomes selected.
To use this function, you need to have an active selection first. Then, choose Select > Inverse or press Shift+Ctrl+I (Win) / Shift+Command+I (Mac) to invert the selection.
Inverse selection is helpful when you want to select the opposite of what you’ve selected. For example, select the background instead of the foreground, or the sky instead of the land.
Inverse selection can also be used to produce negative or inverted effects. For example, it can alter the contrast or color scheme of the chosen area.
Use Cases
- Isolating Objects
Isolating objects is a common use case of selection tools in Photoshop. This involves selecting and separating an object from its background. This allows you to edit it independently or use it in another image.
To isolate an object, you need to make a selection around it using any of the selection tools. The shape and complexity of the object determine which tools to use. You may need to combine tools for a precise selection.
After making the selection, you can either cut or copy the object to a new layer. Or, you can apply a layer mask to hide the background. You can also refine the edges of the selection to make it smoother and more realistic.
Isolating objects can help you create photo composites. It can also help remove unwanted elements and change the background. It can apply effects to specific parts of an image.
- Background Removal
Background removal is another common use case of selection tools in Photoshop. It involves selecting and deleting the background of an image. This leaves only the foreground object.
To remove the background, use any selection tool to select the foreground object. The background’s contrast and detail may need different tools. You might need a combination to achieve a clean selection.
After making the selection, you can either delete the background or apply a layer mask to hide it. You can also refine the edges of the selection to make it smoother and more realistic.
Removing the background can help you create transparent images. It can also change the background or focus on the main subject of an image.
- Selective Editing
Selective editing is another common use case of selection tools in Photoshop. It involves selecting and modifying a specific area or object in an image. The rest of the image is left unchanged.
To edit selectively, use any selection tool to make a selection around the area or object you want to change. The area or object’s shape and size may need different tools. A precise selection may need a combination.
After making the selection, you can use any editing tools or commands in Photoshop to apply changes to the selected area or object.
For example, you can adjust the color, brightness, contrast, sharpness, or saturation of the selection. You can also apply filters, effects, or transformations to the selection.
Selective editing can help you enhance or correct specific parts of an image. For example, you can remove blemishes, change the color of an object, or add text or graphics.
Challenges and Tips
- Anti-aliasing and Smooth Selections
Anti-aliasing is a technique that reduces the appearance of jagged or pixelated edges in a selection. It does this by blending the edge pixels with the surrounding pixels.
Anti-aliasing can help you create smooth, natural-looking selections. It’s especially good for curved or diagonal edges.
Use the Elliptical Marquee, Rectangular Marquee, Lasso, Polygonal Lasso, Magnetic Lasso, or Magic Wand tool. Apply anti-aliasing to a selection. Check the Anti-alias option in the options bar before making the selection.
You can also use the Refine Edge tool to smooth the edges of an existing selection. Adjust the Smooth parameter in the dialog box.
- Handling Complex Backgrounds
Complex backgrounds have a lot of detail. They may have variation or similarity with the foreground object. This makes it difficult to select the object precisely.
You need a combination of selection tools and techniques. They help you create a precise selection for complex backgrounds.
Some of the tools and techniques that can help you handle complex backgrounds are:
The Object Selection tool, which allows you to select an object by drawing a rectangle or a lasso around it. The tool will automatically detect the object. It will create a selection based on its shape and contrast.
Two actions are Select Subject and Select Sky. They let you select the main subject or the sky of an image with one click. These actions use artificial intelligence to analyze the image. Then, they create a selection based on the content.
The Color Range command, which allows you to select pixels based on their color or tone. Use this command to select background areas with a distinct color. Separate them from the foreground object.
The Quick Mask mode, which allows you to paint over the areas you want to select or deselect using a brush. You can use this mode to refine your selection by adding or subtracting pixels manually.
- Avoiding Pixelation
Pixelation is a problem that occurs when the pixels of an image become visible or distorted. This results in a low-quality or blurry appearance.
Pixelation can happen when you enlarge, transform, or apply filters to a selection. This is especially true if the image has a low resolution or a small size.
To avoid pixelation, use high-resolution images. Work with selections that have enough pixels to support the changes you want to make.
Some of the tips and tricks that can help you avoid pixelation are:
Use the Smart Object feature. It allows you to convert a selection into a non-destructive layer. This layer preserves the original image data. You can then resize, rotate, or apply filters to the smart object without losing quality.
Use the Preserve Details 2.0 option. It is a resampling method that uses artificial intelligence. It enhances the details and sharpness of an image. This happens when you enlarge it. To access this option, choose Image > Image Size. Then, select Preserve Details 2.0 from the Resample menu.
Use the Content-Aware Scale command. It allows you to resize a selection. This preserves the image’s important features and proportions. You can access this command by choosing Edit > Content-Aware Scale. Then, drag the handles of the bounding box.
Integration with Other Tools
- Layer Masks:
They are a powerful tool. Layer masks allow you to selectively apply adjustments to specific areas of an image. You can use layer masks to hide or reveal parts of a layer. This makes it possible to blend many layers together seamlessly. Layer masks are often used with change layers. This creates complex image effects.
- Adjustment Layers
Adjustment Layers are a non-destructive way to apply color and tonal adjustments to an image.
They allow you to make changes to an image. This doesn’t permanently alter the original pixels. Adjustment layers can be used to adjust brightness, contrast, color balance, hue, saturation, and more.
They can also be used with layer masks. This allows selective adjustments to specific areas of an image.
- Combining Selections
This is a useful technique. It allows you to create complex selections by combining many simple selections. You can use the Add to Selection and Subtract from Selection tools to add or remove parts of a selection. This makes it possible to create complex selections. It would be difficult or impossible to create them with a single tool. Once you have created a selection, you can use it to apply adjustments. You can also copy and paste parts of an image, or create a new layer.
Comparison with Other Image Editing Techniques
Comparison of selection tools with other image editing techniques. It explains the advantages and limitations of selection tools. It also suggests some possible workarounds for the latter.
Here are the main points:
Selection tools have several advantages. They allow users to isolate and manipulate specific regions of an image. This includes objects, shapes, colors, and textures. This can help users perform tasks such as cropping, resizing, copying, pasting, deleting, filtering, and applying effects to the selected areas. Selection tools can also help users create masks, layers, or paths. You can use these for further editing or compositing. Selection tools are versatile and easy to use. You can combine them with other tools. For example, brushes, gradients, or adjustment layers. This creates complex and realistic results.
Selection tools are not perfect. Sometimes they may fail to select the desired regions accurately or completely. This can happen due to factors such as low contrast, noise, blur, or complex backgrounds. Some common problems that users may encounter with selection tools are:
Edge artifacts are unwanted pixels or gaps along the edges of the selection. They can make the selection look jagged or unnatural. To avoid or fix edge artifacts, users can refine the selection. They can use tools like feathering, smoothing, expanding, contracting, or refining edges. Users can also use tools such as eraser, clone stamp, and healing brush. They can use these tools to manually remove or blend the edge artifacts.
Partial or over selection can happen in two ways. The selection may not cover the entire region of interest, or it may cover more than intended. Users can adjust the selection parameters like tolerance, range, and mode. They can avoid or fix partial or over selection. Users can also use tools such as lasso, marquee, or quick selection to add or subtract from the selection. Users can also use tools such as the magic wand, color range, or select subject. These tools help users select regions based on specific criteria.
Recent Developments and Trends
You are interested in the recent developments and trends in image editing. You are especially interested in the AI-powered selection tools. You are also interested in the real-time selection preview. I see that. Here are some information that I found from the web:
AI-Powered Selection Tools automatically select regions of interest in an image. They use artificial intelligence (AI) and various criteria. Criteria include color, shape, texture, and semantic meaning. AI-powered selection tools can help users save time and effort. They can also achieve more accurate and consistent results. Some examples of AI-powered selection tools are:
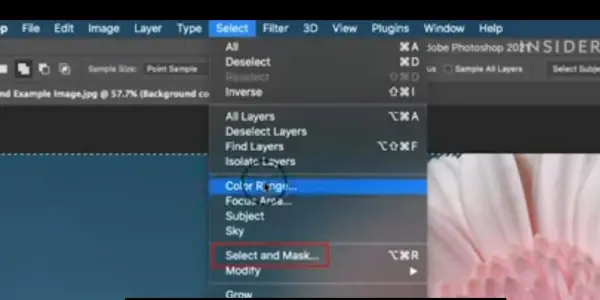
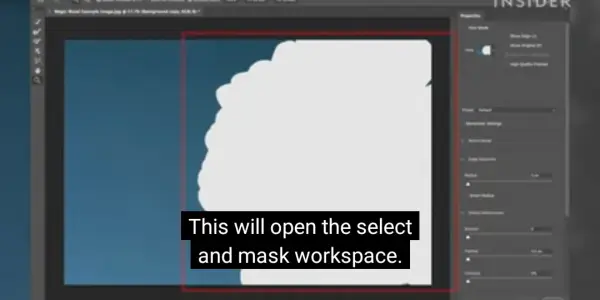
Select Subject and Select and Mask in Photoshop use Adobe Sensei. This is the company’s AI and machine learning platform. They automatically select the main subject or multiple subjects in an image. They refine the selection edges with advanced options.
The Object Selection Tool in Photoshop uses AI. It creates a rectangular or lasso selection around an object or a group of objects in an image.
It also automatically snaps the selection to the object boundaries.
The AI Sky Replacement tool in Luminar 4 uses AI to automatically detect and replace the sky in an image. It also adjusts the lighting, colors, and details to match the new sky.
This project aims to integrate AI-powered selection tools into GIMP. GIMP is an open-source image editor. The project uses a deep neural network to segment an image into semantic regions. It allows users to select them with a simple click.
Real-time Selection Preview is a feature. It allows users to see the effects of their selection tools in real-time. They don’t have to apply the selection first. Real-time selection preview can help users make faster and better decisions. It can also help them fine-tune their selection parameters. Some examples of real-time selection preview are:
Live Selection in Affinity Photo shows a red overlay on the unselected areas of an image. It updates the overlay as the user changes the selection tool or its settings. The user can also toggle the overlay on and off, or adjust its opacity.
Real-time Selection Preview in Paint.NET shows a dashed line around the selected area of an image. It updates as the user changes the selection tool or its settings. The user can also toggle the line on and off, or change its color.
In Krita, Real-time Selection Preview shows a semi-transparent mask on the selected area of an image. It updates the mask as the user changes the selection tool or its settings. The user can also toggle the mask on and off, or change its color and opacity.
Final Words
Recap of Selection Tools’ Significance
Continuous Evolution in Image Editing
The page explains how selection tools are essential for image editing. They allow users to isolate, modify, and manipulate specific regions of an image. Selection tools can also be used to create masks, layers, and effects. This enhances the visual appeal and quality of an image.
The page also discusses how image editing is constantly evolving. It covers new technologies and techniques. For example, AI, machine learning, and generative design. These innovations enable more realistic, creative, and efficient image editing. They also open up new possibilities for artistic expression and communication.
