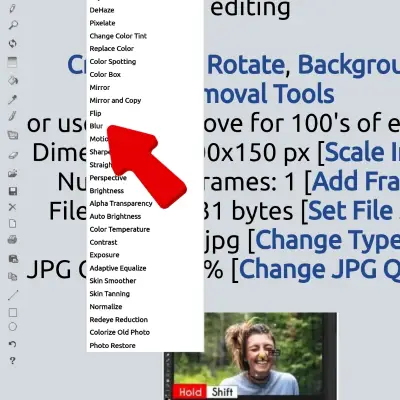
Lunapic Blur Photos
LunaPic is a free online photo editor that offers a variety of tools and effects to enhance your images. One of the features that LunaPic provides is the ability to blur parts or all your photos..Blurring can be useful for creating artistic effects. It can also hide sensitive information or focus attention on certain areas of your image. In this article, we will show you how to use LunaPic to blur your photos in different ways.
Lunapic Blur Method 1: Blur Filter

- The blur filter is the simplest way to blur your entire photo or adjust the level of sharpness. To use the blur filter, follow these steps:
- Go to LunaPic and upload your photo from your computer or a URL.
- From the Adjust menu, select Blur. You will see a slider that lets you adjust the level of blur or sharpness. Drag the slider to the left to increase the blur, or to the right to decrease it. You can also enter a numeric value in the box below the slider.
- Click Apply to see the result. You can undo or redo your changes using the buttons on the top right corner of the screen.
- You can save your photo if you are satisfied with the result. Click on the Save button at the top left of the screen. You can choose the format and quality of your image, and download it to your computer or share it online.


Lunapic Blur Method 2: blur a specific part of image lunapic
- To blur ,a face tool allows you to blur oval shapes on your photo, which can be useful for hiding faces or other details. To use the blur a face tool, follow these steps:
- Go to LunaPic and upload your photo from your computer or a URL.
- From the Draw menu, select Blur a Face. You will see a circle on your photo that you can drag and resize to cover the area you want to blur. You can also change the circle’s shape. Use the drop-down menu on the top left corner of the screen to choose an ellipse, a rectangle, or a custom shape.
- Click on the Blur button on the top right corner of the screen to apply the blur effect. You can adjust the level of blur using the slider below the button. You can also add more circles to blur many areas on your photo.
- Click Apply to see the result. You can undo or redo your changes using the buttons on the top right corner of the screen.
If the result satisfies you, you can save your photo. Click on the Save button in the top left corner of the screen. You can choose the format and quality of your image, and download it to your computer or share it online.
Lunapic Blur Method 3: Crop and Blur
- The crop and blur tool allows you to select any area or shape on your photo and apply the blur effect to it. You can also choose to blur the inside or the outside of the selected area. To use the crop and blur tool, follow these steps:
- Go to LunaPic and upload your photo from your computer or a URL.
- From the Edit menu, select Crop Image. You will see a rectangle on your photo that you can drag and resize to cover the area you want to blur. You can also change the shape of the rectangle. Click the drop-down menu on the top left corner of the screen. Then, choose a circle, a polygon, freehand, or a magic wand.
- Click on the Effects button on the top right corner of the screen. You will see a list of effects that you can apply to your selected area. Choose Blur Inside or Blur Outside. Choose based on whether you want to blur the inside or the outside of the selected area. You can adjust the level of blur using the slider below the button.
- Click Apply to see the result. You can undo or redo your changes using the buttons on the top right corner of the screen.
If you are satisfied with the result, you can save your photo. Click on the Save button on the top left corner of the screen. You can choose the format and quality of your image, and download it to your computer or share it online.
