Layer Effects
Layer effects are a collection of non-destructive, editable effects. You can apply them to almost any kind of layer in Photoshop, such as text, pixel, or shape layers. They include effects such as shadows, glows, strokes, overlays, and more. Layer effects are live effects that link directly to the layer content. They update automatically when the content changes. A layer style is a combination of two or more layer effects that create a specific look or style
How To Apply a Layer Effect Or Style ?
To apply a layer effect or style, select the layer in the Layers panel.
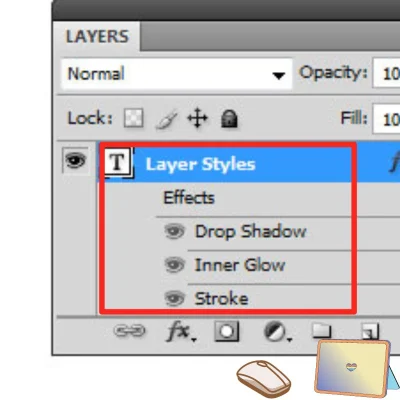
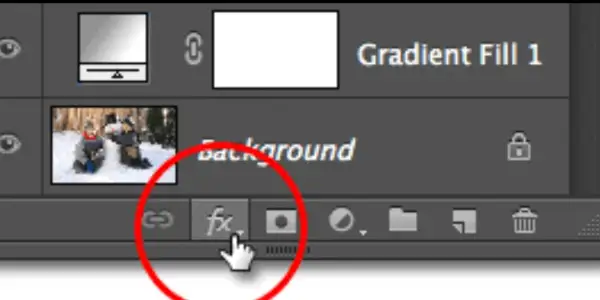
Click the fx icon at the bottom of the panel. This will open the Layer Style dialog box, where you can choose from a list of effects and adjust their settings. You can also use the Presets panel to access and apply preset styles. You can also use it to apply gradients and patterns to your layer.
Photoshop 2020 has hundreds of new and improved presets. You can use them or customize them to your liking. You can also create and save your own presets for future use. To add many copies of an effect to the same layer, click the plus icon next to the effect name in the Layer Style dialog box. This will create a new instance of the effect with the same settings. You can then change it independently. Layer mask in image editing
You can use layer effects and layer styles to create various effects for your design. These include realistic, cartoon, retro, futuristic, and artistic. For example, you can use a drop shadow and a bevel and emboss effect to create a 3D text effect. Or, you can use a gradient overlay and a stroke effect to create a metallic text effect. You can also use layer effects and layer styles to create buttons, icons, logos, banners, and other graphics. Here are some tips and tricks to use layer effects and layer styles effectively:
- Use layer effects and layer styles sparingly and tastefully. Don’t overdo it or use too many effects on the same layer. This can make your design look cluttered, messy, or unrealistic.
- Experiment with different effects and settings. Find the ones that suit your design and purpose. You can preview the effects in the Layer Style dialog box or the document window before applying them.
- Use the global light option. This ensures consistent light source and direction across all layers and effects. You can access the global light option from the Layer Style dialog box or the Layer menu.
- Use the scale and contour options to adjust the size and shape of the effects. You can access the scale option from the Layer Style dialog box or the Layer menu. You can also access the contour option from the Layer Style dialog box or the Properties panel.
- Use the blending options to control how the effects interact with the layer content. Also, use them to control how the effects interact with the underlying layers. You can access the blending options from the Layer Style dialog box or the Layer menu. You can also use the Blend If sliders. This helps create smooth transitions and hide unwanted areas of the effects.
What are some common layer effects?
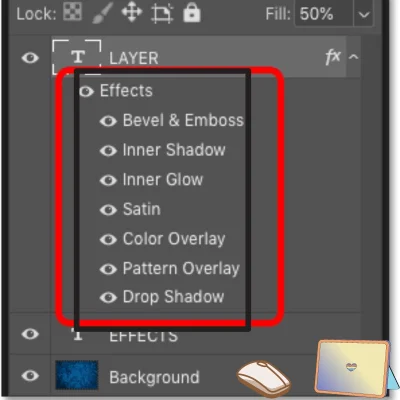
Some common Photoshop layer effects are:
- The drop shadow effect adds a shadow behind the layer content. It creates a sense of depth and distance.
- The Outer Shadow effect adds a shadow behind the layer. It gives the layer a sense of depth and distance from the background. You can use it to create a realistic or dramatic lighting effect.
- Inner shadow: This effect adds a shadow inside the edges of the layer content. It creates a recessed or cut-out look.
- The outer glow effect adds a glow around the outside of the layer content. It creates a halo or backlight effect.
- Inner glow: This effect adds a glow inside the edges of the layer content, creating a lit or embossed effect.
- Bevel and emboss: This effect adds highlights and shadows to layer content. It creates a 3D or textured effect.
- The Stroke effect adds a border around the layer content. This creates an outline or frame effect.
- Color overlay: This effect fills the layer content with a solid color. It creates a tint or colorize effect.
- This effect fills the layer with a gradient. This creates a blend or transition effect.
- This effect fills the layer content with a pattern. It creates a fill or texture effect.
- Satin: This effect applies an interior shading to the layer content. It creates a satin or silk effect.
- 3D Effect: This effect transforms the layer into a 3D object, creating a perspective or a depth effect. You can use it to create a realistic or a distorted effect
- Gaussian Blur blurs the edges of the layer. This creates a smooth transition between the layer and the background. You can use it to create a soft focus or a depth of field effect2.
- Outline:This effect adds a border around the layer. It creates a framed or highlighted effect. You can use it to create a contrast or a separation effect.
These are some of the most common layer effects. But, there are more effects for you to explore and apply to your layers. You can also combine many effects to create custom layer styles. I hope this helps you understand the basics of layer effects in Photoshop.
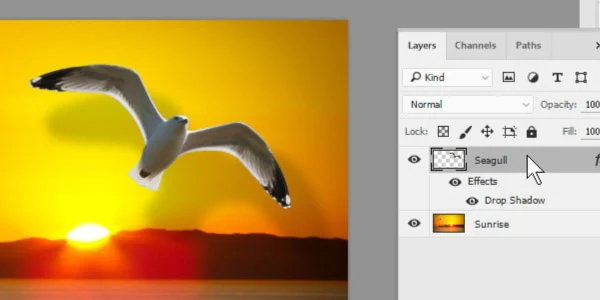
How do I apply layer effects?
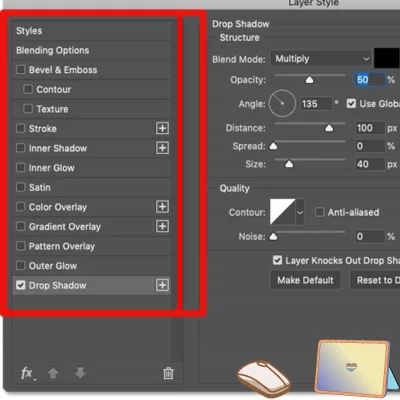
Layer effects can change a layer’s appearance in graphic design. They’re non-destructive. To apply layer effects, you need to select a layer from the Layers panel and then do one of the following:
Double-click the layer outside the layer name or thumbnail.
Click the Add A Layer Style icon at the bottom of the Layers panel and choose an effect from the list.
Choose Layer > Layer Style and choose an effect from the menu.
You can also use the Styles panel to apply preset styles that contain many effects. To open the Styles panel, go to Window > Styles. Then, select a layer and click on a style from the panel. You can also drag a style from the panel onto a layer in the Layers panel or the document window.
How do I apply layer effects to a group of layers?
To apply layer effects to a group of layers in Photoshop, you need to do the following steps.
- Select the layers that you want to apply the effects to and press Ctrl+G (or Cmd+G on Mac) to create a group.
- Change the group’s blending mode from “Pass Through” to “Normal” in the Layers panel. This will make the group behave as a single layer.
- Add an adjustment layer above the group. Choose the effect you want from the Layer Style dialog box. You can also use the Presets panel. It lets you access and apply preset styles, gradients, and patterns to your group.
- If you want to apply many effects to the same group, add more adjustment layers. Clip them to the group by pressing Alt+Ctrl+G (or Option+Cmd+G on Mac). Or, click the third icon from the left at the bottom of the Layers panel.
I hope this helps you apply layer effects to a group of layers in Photoshop.
How do I remove or edit an effect from a layer style?
To remove or edit an effect from a layer style in Photoshop, you need to do the following steps.
- Select the layer that has the layer style applied to it in the Layers panel.
- Double-click the layer outside the layer name or thumbnail to open the Layer Style dialog box.
- To remove an effect, uncheck the box next to the effect name. To edit an effect, click the effect name and adjust the settings as desired.
- Click OK to apply the changes and close the dialog box.
Alternatively, you can drag the effect name from the Layers panel to the delete icon at the bottom-right of the panel. This will remove it. I hope this helps you remove or edit an effect from a layer style in Photoshop.
1: Layer effects and styles in Adobe Photoshop 2: Using Layer Effects and Styles in Photoshop CC 2020 – Complete Guide 3: Layer Effects and Styles in Photoshop – javatpoint
How do I apply an effect to only one part of a layer content?
There are different ways to apply an effect to only one part of a layer content in Photoshop. It depends on the type of effect and the desired result. Here are some possible methods:
- You can use a selection tool to choose the part of the layer you want to affect. Then, apply the effect from the Filter menu or the Layer Style dialog box. This will create a pixel mask that limits the effect to the selected area.
- You can use a layer mask to hide or reveal parts of the layer content or the effect. To do this, you need to make the layer a smart object first, and then apply the effect as a smart filter. This will create a filter mask that you can edit with a brush tool or a gradient tool. You can also add a layer mask to the smart object layer and paint on it to show or hide parts of the layer content.
- You can use a mask reference to apply an effect to a masked area in After Effects. To do this, you need to make a mask on your layer, and then add an effect. Then, you need to twirl down the effect to reveal the compositing options in the timeline. Next, you need to hit the plus button to make a mask reference, and select your mask. We will only apply the effect to the masked area.
I hope this helps you apply an effect to only one part of a layer content in Photoshop or After Effects.
What is the difference between layer effects and styles?
Layer effects are the individual effects, like Drop Shadow and Outer Glow. Styles, on the other hand, are collections of these effects. A layer style is a collection of two or more layer effects working together. They create a larger, overall look. The layer contents link to the layer effects. They update automatically when you edit the layer. A layer style is a preset that you can apply to a layer with one click1. You can also create your own custom layer styles. Combine different layer effects.
Can you show me how to create a custom layer style?
Sure, I can show you how to create a custom layer style in Photoshop. A layer style is a collection of two or more layer effects working together to create a larger, overall look. Layer effects are non-destructive, editable effects. You can apply them to almost any kind of layer in Photoshop. Here are the steps to create a custom layer style:
Select a single layer from the Layers panel.
Double-click outside the layer name or thumbnail. Alternatively, click the Add A Layer Style icon at the bottom of the Layers panel. Choose an effect from the list. You can also choose an effect from the Layer > Layer Style submenu.
The Layer Style dialog box will open, where you can choose and adjust the effects you want to apply to the layer. You can also change the blending options and the opacity of the layer.
To add more effects to the layer, click on the checkboxes next to the effect names on the left side of the dialog box. You can also click on the effect name to access its options on the right side of the dialog box.
Make sure to check the Preview option at the top right of the dialog box to preview the effects on the layer. You can also drag the layer in the document window to see how the effects look from different angles.
To save the layer style as a preset, click the New Style button at the top right of the dialog box. Give the style a name and click OK. The style will appear in the Styles panel, where you can apply it to other layers with one click.
To apply the layer style to the layer, click OK at the top right of the dialog box.
Here is an example of a custom layer style that I created using a Drop Shadow. It also includes an Inner Shadow, a Bevel and Emboss, and a Gradient Overlay effect.
